Showing posts with label galaxy. Show all posts

Thursday, May 23, 2013

Samsung Galaxy Mega 6.3 gets a pre-order price in UK, coming in July


Samsung announced the Galaxy Mega 6.3 last month. Online retailer Clove UK has announced that they have started taking pre-orders for the device.  It has a 6.3-inch HD ( 1280 x 720 pixels) TFT capacitive touch screen display, powered by a 1.7 GHz dual-core processor and runs on Android 4.2 (Jelly Bean). It packs a 8-megapixel auto-focus rear camera with LED Flash,  a 1.9-megapixel front-facing camera and comes with a 3200 mAh battery.

Samsung Galaxy Mega 6.3 specifications
  • 6.3-inch HD ( 1280 x 720 pixels)  TFT capacitive touch screen display
  • 1.7 GHz dual-core processor
  • Android 4.2 Jelly Bean OS
  • 8MP auto-focus rear camera with LED Flash
  • 1.9 MP front-facing camera
  • 7.9mm thick and weighs 199 grams
  • 1.5 GB RAM, 8/16GB Internal Memory, expandable memory up to 64GB with micro SD
  • 4G LTE 100/50Mbps, 3G  HSPA+21Mbps, Wi-Fi a/b/g/n/ac, WiFi Direct, Bluetooth 4.0, GPS+GLONASS, NFC, MHL
  • 3200 mAh battery
The Samsung Galaxy Mega 6.3 is priced at 383.33 GBP (~US$578.52) (459.99 GBP including VAT). It comes in Black and White colors and is expected to ship sometime in July.
Source: Clove

Friday, May 17, 2013

Samsung Galaxy S4 to be Optimized for Improved Internal Storage Capacity

The Samsung Galaxy S4 is a generally well received smartphone, however, the devices operating system and additional software add-ons take up a large chunk of the mobile devices internal storage capacity.
According to a new report the company is now preparing to fix storage issues. The BBC consumer affairs show Watchdog investigated numerous customer complaints about TouchWiz implementation and other additions that took up valuable storage space.
Samsung is not the only phone manufacturer to suffer from storage issues. For example, the HTC One offers 16GB but takes up 7.14GB of space. Apple on the other hand takes up just 3.5GB for its storage space on the iPhone 5.

The 16GB model of the Samsung Galaxy S4 leaves buyers with just 8.82GB of free space. The one advantage the device has over the HTC One and Apple iPhone models is the inclusion of a microSD card slot that provides greatly expanded memory up to 64GB.
Speaking to CNET Samsung says of the internal memory issue:
“We appreciate this issue being raised and we will improve our communications. Also, we are reviewing the possibility to secure more memory space through further software optimization.”
Users looking for a Samsung Galaxy S4 with better memory management might want to wait for the unlocked Google version of the smartphone. Google recently announced that it would sell a fully unlocked version of the Galaxy S4 that comes equipped with a stock installation of Google Android.
The Android stock version of Samsung’s Galaxy S4 will go on sale June 26 for $649.
Google has not yet announced which version of the Google Android OS will be placed on the Samsung Galaxy S4.
Will you be purchasing the Samsung Galaxy S4 or would you rather buy the stock Google Android version which will likely take up less memory?


Sunday, February 10, 2013

Install Windows 8 Themed Custom ROM on Samsung Galaxy y


As you can see, this surely appeals to be one of the most classy ROMs for the little droid which many of the users may be looking for! So, before the urge spills the beans out, let us get started and see whether you can get through with the installation process of the ROM by following this step by step tutorial

Prerequisites

  • Back up all apps using ASTRO File Manager. You can get the APK files using ASTRO and later restore it. Rooted users can use Titanium Backup which also backs up data along with the apps.
  • Back up all contacts to SD card.
  • Backup SMS on Android.
  • Backup call log on Android.
  • Have minimum 60% charge on your phone else you might get stuck while the update process is running on your device.
  • Remove any security or Anti-virus app if you have them installed.
  • Enable USB Debugging. This can be don by Settings>Applications>Development and making sure that USB Debugging is checked.
Disclaimer: Tech-Infinit is not responsible for any damage that your device may face during this process. The developer is also not responsible for the same. There are little chances that your device may face any issue. However, try this at your own risk. This process voids the warranty of your device.
 

Steps to Install Windows 8 Themed Custom ROM on Galaxy Y

  1. Download the zip file from the original thread.
  2. Connect your phone to the computer via USB cable and copy the downloaded zip files to your SD card, preferable not within any folder deep inside.
  3. Disconnect your phone from the PC and turn it off.
  4. Reboot into recovery mode by pressing Home button + Volume up button and Power button for 20 seconds.
  5. When you are in the recovery mode, head over to the backup option and perform a nandroid backup. This would be useful if you wish to revert back  to your current ROM.
  6. Now, before proceeding, check whether you have installed deodexed version of the stock ROM which will act as a base for the process.
  7. Go back and select “Install zip from SD card”>”Choose zip from SD card” and select the zip file(downloaded in Step#1). Flash it in the next screen.
  8. Go back and select “reboot system now”.
  9. If your phone rebooted successfully, the Windows 8 themed bootup screen might have sparkled up your face which means you’re through!


Install Windows Phone 8.0 Rom on Samsung Galaxy Ace [How To]


we will teach you all the Main and Basic steps required to Install Windows Phone 8.0 ROM ( Which is a Custom Rom aka Copy of Windows Phone 8.0 likes of Nokia Lumia 920, HTC 8x, etc.) on Samsung Galaxy Ace.
Basically all the installation of Custom Roms ( Like CyanogenMod 7, GINGERCRUZT-2.2, iOS 5[CUSTOM ROM], XperiaTized, Beats With Smooth Sense 6 ROM, S3-Evolution ROM, Windows Phone 8.0 ROM). Required the same steps that today you going to learn.
The Steps are Quite simple if you do the exact same way the way this tutorial is going to teach you.
NOTE: - This practical was performed on Samsung Galaxy Ace. To get a perfect result we suggest  you to use Samsung Galaxy Ace. (READ EVERY STEP BEFORE PERFORMING ROOTING).
NOTE: - Your Android Device Should be Rooted and Clockwork Recovery Mod - 5.0.2.6 should be Installed In Your Device.
Steps Of Installation Of Windows Phone 8.0 ROM On Samsung Galaxy Ace : -
1. After Rooting and Installing Clockwork Recovery Mod - 5.0.2.6 on your Galaxy Ace. Now Power off the device.
2. Now download Windows Phone 8.0 ROM from HERE.
3. Copy the Downloaded File to your external memory (SD card).
4. Now, Switch ON your Galaxy Ace in Recovery Mode by pressing Power Button and Home Button Together.
5. Now you will Notice A Black Screen with Blue Highlighted Words.
6. Now Your Touch Screen Will Not Work. Therefore, Use Volume Key to Switch between Menu (Rocker Keys ), Press Power Key to go back to Previous Menu and Home Key to Select.
7. Now Select Wipe Data/Factory Reset.
8. Select Yes.
9. Now Select Wipe Cache Partition.
10. Select Yes.
11. And Now select Choose ZIP from SD Card.
12. Select WindowsPhone8.0v2.Zip ( File Name Of Downloaded File )
13. Select Yes.
14. Your Screen will be prompted Showing Some Codes.
15. And Now your Android Device will be Rebooted Automatically.
16. In First boot up your device will take some time but will Boot In Your New Custom Rom.
i.e. Windows Phone 8.0 ROM.
NOTE: - If  your mobile takes more than 10-15 Minutes to boot after Installing Your Windows Phone 8.0 ROM . Then Re-Do Steps Number : - 4, 5, 6, 7, 8, 9, 10. This will Solve Your Problem.
NOTE: - This is only educational purpose. We Don't Take Any Responsibility if any bad thing happens to your Android Device.
Technorati Tags: ,,

Install iOS 5 (ROM) On Samsung Galaxy Ace [How To]

Today we will teach you all the Main and Basic steps required to Install iOS 5 (Which is a Custom Rom aka Copy of Apple iPhone's iOS 5) on Samsung Galaxy Ace.
Basically all the Custom Roms Installation (like CyanogenMod 7, GINGERCRUZT-2.2, iOS 5[CUSTOM ROM], XperiaTized, Beats With Smooth Sense 6 ROM, Sony-HD ROM ). Required the same steps that today you going to learn.
The Steps Are Quite Simple if you do the exact same way the way this tutorial is going to teach you.
NOTE: - This practical was performed on Samsung Galaxy Ace. To get a perfect result we suggest you to use Samsung Galaxy Ace. ( READ EVERY STEP BEFORE PERFORMING ).
NOTE: - Your Android Device should be Rooted and Clockwork Recovery Mod - 5.0.2.6 should be Installed In Your Device. ( To learn how to Root Your Android Device Click Here ).
Steps Of Installation Of  iOS 5[CUSTOM ROM] On Samsung Galaxy Ace :-
1. After Rooting and Installing Clockwork Recovery Mod - 5.0.2.6 on your Galaxy Ace. Now Power Off the device.
2. Now download  iOS 5 [CUSTOM ROM]  from HERE.
3. Copy the Downloaded file to your external storage device (SD Card).
4. Now, Switch ON your Galaxy Ace in Recovery Mode by pressing  Power Button and Home Button Together.
5. Now you will Notice a Black Screen with Blue Highlighted Words.
6. Now your Touch Screen Will Not Work. Therefore, Use Volume Key to Switch between Menu (Rocker Keys), Press Power Key to go back to Previous Menu and Home Key to Select.
7. Now Select Wipe Data/Factory Reset.
8. Select Yes.
9. Now Select Wipe Cache Partition.
10. Select Yes.
11. And Now Select Choose Zip From SD Card.
12. Select iOSBlack-SGA.Zip ( File Name Of Downloaded File )
13. Select Yes.
14. Screen will be Prompted Showing Some Codes.
15.  And Now your Android Device will be Rebooted Automatically.
16. In First Boot Up your device will Take Some Time but will boot in your New Custom Rom. i.e.  iOS 5 [CUSTOM ROM].
NOTE: - If your mobile takes more than 10-15 Minutes to boot after installing your iOS 5 [CUSTOM ROM] . Then Re-Do Steps Number : - 4, 5, 6, 7, 8, 9, 10. This will Solve Your Problem.
NOTE: - This is only educational purpose. We Don't Take Any Responsibility if any bad thing happens to your Android Device.
Technorati Tags: ,,

Rooting Your Samsung Galaxy Ace [How To]


Today we are going to teach you few and easy step to root your android device. We have seen many people asking for rooting method for there android device.
It's Quite simple if you do the exact same way the way this tutorial is going to teach you.
NOTE: - This practical was performed on Samsung Galaxy Ace. To get a perfect result we suggest you to use Samsung Galaxy Ace. (READ EVERY STEP BEFORE PERFORMING ROOTING ).
Steps Are Quite Simple: -
1. For Rooting your device you have to download a ZIP file from here Root.zip.
2. Connect your Android device to your PC/Laptop.
3. Copy Root.zip to your external memory ( SD Card ) of your android device.
4. Switch Off your android device.
5. Now press Power Button and Home Button together to Switch ON.
6. NO need to be worried as your Android Device will boot up in Recovery Mode ( Black Screen With Blue Highlights ).
7. NOTE: - For this process i advice you to have up to 50 MB of Free Space should be there in your Internal Memory ( Phone Memory). If you don't have then Errors Might Be Prompted.
8. Select install update from SD Card ( Most probably the first option ).
9. Go to ROOT.ZIP using Volume Key.
10. Select it using Home Key.
11. NOTE: - For this process i advice you to have up to 50 MB of Free Space should be there in your Internal Memory ( Phone Memory). If you don't have then Errors Might Be Prompted.
12. Now if a option ask yes or no Select Yes.
13.  Your Screen will be prompted with few coding saying installing and soon It Will Be Installed.
14. Reboot Your Mobile.
15. Your mobile will now be rooted Properly in a fine way.
For Unrooting your Android device clich here

Saturday, February 9, 2013

Unroot Your Samsung Galaxy Ace [How To]

Today we are going to teach you few and easy step to Unroot Your Android Device. We have seen many people asking for Unrooting method for there android device as they didn't like there device in rooted mode.
It's Quite simple if you do the exact same way the way this tutorial is going to teach you.
NOTE: - This practical was performed on Samsung Galaxy Ace. To get a perfect result we suggest you to use Samsung Galaxy Ace. (READ EVERY STEP BEFORE PERFORMING ROOTING ).
Steps Are Quite Simple:-
1. For Unrooting your device you have to download a ZIP file from here "UnRoot.ZIP".
2. Connect your Android device to your PC/Laptop.
3. Copy Root.zip to your external memory of your android device.
4. Switch off your android device.
5. Now press "POWER BUTTON" and "HOME BUTTON" together to switch ON.
6. NO need to be worried as your ANDROID DEVICE will boot up in RECOVERY MODE (black screen with BLUE HIGHLIGHTS).
7. NOW YOUR TOUCH SCREEN WILL NOT WORK. THEREFORE, USE "VOLUME KEY" TO SWITCH BETWEEN MENU (ROCKER KEYS), "POWER KEY" TO GO BACK TO PREVIOUS MENU AND "HOME KEY" TO SELECT.
8. Select install update from Sd card (most probably the first option).
9. Go to "UNROOT.ZIP" using "VOLUME KEY".
10. Select it using "HOME KEY".
11. NOTE:- FOR UNROOTING YOUR DEVICE I ADVICE YOU TO HAVE UPTO 50mb OF SPACE FREE IN YOUR INTERNAL MEMORY(PHONE MEMORY), IF YOU DON'T THEN ERRORS MIGHT BE PROMPTED.
12. Now if a option ask yes or no SELECT YES.
13.  Your Screen will be prompted with few coding saying installing and SOON it will be INSTALLED.
14. REBOOT YOUR MOBILE.
15. Your mobile will now be Unrooted Properly in a fine way.
NOTE: - This is only educational purpose. We Don't Take Any Responsibility if any bad thing happens to your Android Device.
Technorati Tags: ,

Install Clockwork Recovery MOD - 5.0.2.6 on Samsung Galaxy Ace [How To]

]


Today we are going to teach you few and easy step to Install Clockwork Recovery Mod - 5.0.2.6  your android device. We have seen many people asking for this method for there android device as they wanted to install new Custom Rom to their Android Device.
It's Quite simple if you do the exact same way the way this tutorial is going to teach you.
NOTE: - This practical was performed on Samsung Galaxy Ace. To get a perfect result we suggest you to use Samsung Galaxy Ace. (READ EVERY STEP BEFORE PERFORMING ROOTING ).
NOTE: - Your Android Device should be Rooted for Installing  Clockwork Recovery Mod.
Steps Are Quite Simple: -
1. For Installing Clockwork Recovery Mod - 5.0.2.6 on your device you first have to download Clockwork Recovery Mod - 4. As, Clockwork Recovery Mod - 5.0.2.6 Supports New Custom Roms and is handy to work with.
2. Download Clockwork Recovery Mod - 4.
2. Connect your Android Device to your PC/Laptop.
3. Copy the downloaded file to your external memory(SD Card) of your android device.
4. Switch Off your android device.
5. Now press Power Button and Home Button together to Switch ON.
6. NO need to be worried as your Android Device will boot up in Recovery Mode ( Black Screen With Blue Highlights).
7. Now your Touch Screen Will Not Work. Therefore, Use Volume Key to Switch between Menu (Rocker Keys), Press Power Key to go back to Previous Menu and Home Key to Select.
8. Select install update from SD Card ( Most probably the first option ).
9. Go to ClockWorkModAce.zip using Volume Key.
10. Select it using Home Key.
11. NOTE: - For this process i advice you to have up to 50 MB of Free Space should be there in your Internal Memory ( Phone Memory). If you don't have then Errors Might Be Prompted.
12. Now if a option ask yes or no Select Yes.
13.  Your Screen will be prompted with few coding saying installing and Soon It Will Be Installed.
14. Reboot Your Mobile.
15. After Rebooting your device Download CLOCKWORK RECOVERY MOD - 5.0.2.6 and copy it on your external memory (SD Card).
16. And Now perform the Same Steps as you have performed for Installing Clockwork Mod-4.
17. After installation is complete Reboot Your Device.
18. Now you have Clockwork Recovery Mod - 5.0.2.6 on your Android Device.
NOTE: - This is only educational purpose. We Don't Take Any Responsibility if any bad thing happens to your Android Device.

Simplicity V2 { Jelly Blast } Custom Rom for Samsung Galaxy Ace GT-S5830i, GT-S5830m, GT-S5830C

Simplicity V2 ( jelly blast ) Rom & Kernel for Samsung Galaxy Ace S5830 based on latest firmware xxli1. This Rom is Smooth, very light (43 mb use only out of 189 mb) and fast. This Rom is developed by the member of XDA abhi922 so if you like his work don't forget to thanks him. So here are few screenshots of Simplicity V2 ( jelly blast ) Rom running on Samsung Galaxy Ace GT-S5830i, GT-S5830m, GT-S5830C


Screenshots:


Warnings:

This custom Rom is only meant for Samsung Galaxy Ace S5830 and not for any other device. Use at your own Risk we will not be held responsible for any damage to device. The instructional guide here provided here is for is only for instructional and educational purpose.
Features:
  • Latest firmware xxli1
  • Rooted
  • Deodex
  • Simple but fully loaded with features & ics framework make it sleek and give glossy look
  • Host file modified to remove ads from free apps
  • 15 ics toogle and 6 ics lockscreen
  • int.d support
  • Added domscript
  • Added rafeal final edition kernel
  • Added rz recovery as default 
  • Alot of tweaks added into build.prop
  • Extremely barebone rom
  • 43 mb use only out of 189 mb
  • All apps are updated
  • Latest playstore
  • Ics keyboard added ( updated)
  • Latest superuser added
  • Ics wallpapers
  • Ics settings
  • Ics calculator
  • Ics deskclock modded by me 
  • Opera mini as default browser
  • Ics gallery (quicpic)
  • Extended rom settings
  • Jelly bean battery bar above status bar [ single blue line ] (check in screenshot)
  • Google ics music
  • Spareparts settings
  • Cpu control settings
  • Battery bar color,animation,etc setting
  • Cyanogenmod settings (rom settings) intrgrated in system settings... [ not real cm settings only modded to look like ]
  • Uses less ram ( ram optimised)
  • Roboto fonts
  • System font color changed to ics
  • System summary font color changed to white
  • New file manager ( root explorer feature included)
  • New cm9 bootanimation ( cm9 cid )
  • Removed battery icon from statusbar.
BUGS:
  • Camera settings are small FIX here

Download: Rom File:(not mirror) Simplicity v2 (jelly blast).zip
Rom size: 94.37 MB
Installation Instruction:
  • Shutdown the phone
  • Goto stock recovery/cwm
  • Select the option "apply update from sdcard"
  • Select the file ( boot.img.zip ) [download]
  • Wait the end of process and reboot
  • Now goto recovery [ new rz recovery will open ]
  • Then goto option "install menu"
  • Select the file ( Farmat-All-EXT4.zip ) [download]
  • Wait the end of process
  • Now do not reboot and again goto "install menu" 
  • Select the file Simpilicity v2 (jelly blast).zip 
  • wait the end of process and reboot
  • just follow steps carefully first boot may take long time.
Congratulation! Now you have successfully installed Simplicity V2 Rom & Kernel on your Samsung Galaxy Ace S5830.


Jelly Blast JB 4.1.1 Galaxy Ace S5830i


Discription:-
**** READ ALL INSTRUCTIONS CAREFULLY*******
The Jelly Blast ROM for the Galaxy Ace S5830i is one of the best choices out there if you want to upgrade your phoneto the latest version of Android Jelly Bean. The ROM is based on CyanogenMod 10 and lets you enjoy Android 4.1.1 Jelly Bean with all new features. The ROM is a port from the Jelly Blast ROM for the Galaxy Y. The Galaxy Ace version is very fast and smooth. Needless to say it is a battery-friendly ROM. If your mind is stuffed with Jelly Bean, go for it and it would not disappoint you. Being based on CM, the ROM also supports themes which can be downloaded from the Play Store.
How to Install a Custom ROM on Galaxy Ace S5830i:
Making Preparations:
Well, if you ready to flash a custom ROM on your Galaxy Ace 5830i, you need to do a few things before proceeding to flash the ROM.  Among the other things you need to do before installing this ROM are:
### ROOT IS NEEDED####
what is root:-Samsung Galaxy Ace GT S5830 a popular Android phone. It is a mid-end Android device with pretty cool features. If you are owner of this little monster and want to enhance its capabilities by installing custom ROMs, you will need to root your device. After rooting the device, you will not only be able to install apps that need root access to the system files of your device, but choose from hundreds of custom ROMs for your device.
Note that the method for rooting the Samsung Galaxy Ace S5830 given in the present tutorial applies to devices on Froyo and Gingerbread firmwares. To know the firmware version of your device, go to Settings> About. Below you will find separate sets of tutorials for Froyo and Gingerbread firmwares.
Preparations:
  • Create a backup of your contacts, messages and other important data on your device so that you do not lose them in case anything goes wrong.
  • Charge your device properly to a decent battery level.
  • Turn on the USB Debugging on your device:  Settings > Applications > Development > USB debugging.
  • Download the Rooting Package for Samsung Galaxy Ace on Gingerbread (do not extract).
  • Download and  SuperOneClickv1.9.1-ShortFuse.Zip (for Froyo).


   . After rooting, you r now ready to install rom in your device .  Installing a ROM on Galaxy Ace:
  1. First of all make sure that you have done all things mentioned above under preparations.
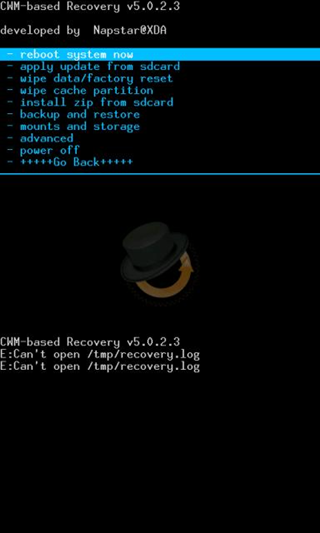
  2. Turn off your device and boot it into CWM Recovery Mode. Press and hold  the Volume Up + Home keys and then long ress  the Power key till the start up screen with “Samsung Galaxy Ace GT-S5830i″ logo blinks for two times and you see a screen as shown below.  Another way to boot the device into ClockworkMod  to download the ROM Manager app from the Google Play Store and use “Reboot into Recovery” option.
  3. In the Recovery Mode, use Volume, Home and Power keys to navigate between the options and select them.
  4. Open “backup and restore” and backup your current ROM (important). When the backup is done go back to the main menu
  5. In the CWM Recovery Mode, scroll to “wipe data factory reset” option and select “Yes”.
  6. Go to Advanced option and “wipe dalvik cache”.
  7. Then come back to the main menu and select “install zip from sdcard> choose zip from sdcard”. Now browse to the ROM file and select it. Confirm your choice by selecting “yes”.
  8. This will start the installation process and will take a few minutes to complete.
  9. When it is done, go back and install the GApps using Step 8.
  10. Return to the main menu again and select “reboot system now”. It might take a few minutes before your device reboots, so a little patience is required.
When the phone boots up, you will be able to enjoy the newly installed Jelly Bean ROM on your Galaxy Ace S5830i. Cheers!


Screenshots:-

Download :-  jelyblast rom


READ ALL INSTRUCTION CAREFULLY
ROOT YOUR DEVICE
INSTALL ROM
ENJOY JELLYBLAST!!!!!!!!!


How to Root the Samsung Galaxy Ace (S5830)

The Samsung Galaxy Ace is (now) a low-end device that was released in February 2011 and came with features like 3.5-inch touchscreen display, HSDPA network support, an 800MHz processor, and a 5MP camera.  Not bad, but if you want something more from this, rooting, installing ClockworkMod Recovery and flashing a custom ROM is the way to go.  This guide below will help you get that first step out of the way – rooting the Galaxy Ace.
I.  Before You Begin
1.  Back up everything you feel is important.
2.  Make sure you have your device charged to 75% or more before you begin.
II.  Necessary Downloads
universal_gb_root_v25.zip [Download }
III.  Rooting the Galaxy Ace
1.  Connect your device to your PC in USB Mass Storage Mode and copy the universal_gb_root_v25.zip to your SD card.
2.  Disconnect your device and shut it down.
3.  Press and hold the Home button + Power button and let them once your device boots into recovery mode.
4.  Use the Volume Up and Down keys to highlight to apply update from sdcard and press the home button to select it.
5.  Locate and select universal_gb_root_v25.zip to flash the file.
6.  Once you see the install from sdcard complete message, highlight and select reboot system now.
Your Galaxy Ace should be rooted once it reboots!
(caution, all the above files and method are genuine, if any damages happening during the rooting we are not responsible)